 |
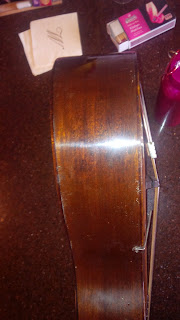
| Multiple cracks in lower bout- mahogany side |
Structurally the sides of a hollow body guitar need to be stiff to maximize the top sound board vibration. This is good and means adding cleats to support the weak crack area should not impact the sound. Messing with this is harder since the guitar is an f-hole style so there is not a good sized sound hole to get inside.
I only used one reference for this:
The hard part of the repair is to figure how to place full pressure to flatten the crack with limited room to reach inside the guitar.
The mahogany is flexible where it is split and new cleats need to be installed the full length of the splits to re-level the split area with the body curve. 3 cleats about 3/8 inches wide and a couple inches long will be installed vertically.
Need to fill the holes, rework the finish and possibly add some linen and glue patches inside to make sure the splits don't extend- so far I dont think the linen patches are needed.
A good reference for spray schedule and tips. http://www.reranch.com/101a.htm
 |
| Inside body - dark pieces are thin original linen and glue side cleats and the splits are on the right side of the image between the cleats |
 |
| Cracks viewed through the f-hole |
 |
| This shows the setup- Tension tool with a guitar string through the side leading out the sound hole with the mahogany cleat and aluminum backing plate before being dropped into the sound hole. |
 |
| Second cleat in place after tightening with aluminum backing plate in place. |
 |
| Due to the size of the tension tool the cleats are installed one at a time and allowed to set. |
 |
| Tension tool in place without a base piece being used -see below. Should only be used this way if you are pulling out a dent otherwise use a base plate. |
 |
| Between cleat installation break or remove glue with a razor to make sure split pieces can move. |
 |
| Wire through body after curing. |
 |
| 3 holes used to set the cleats marked with arrows |
 |
| Inside view- Three cleats and additional glue to stabilize cracks |
 |
| Final before working the finish. All splits and damage pulled even with the body curve. |
Need to fill the holes, rework the finish and possibly add some linen and glue patches inside to make sure the splits don't extend- so far I dont think the linen patches are needed.
 |
| First sanding- 320 dry and 600 wet |
 |
| Filling with super glue |
 |
| Sanded again 600 and 800 both wet All hairline cracks filled |
 |
| Drop fill some low spots |
 |
| Stain mix of Minwax dark walnut and red mahogony 50:50 mix for Martin match |
 |
| Razor leveling fills after one day drying. Scotch tape on ends gets it close then 600 & 800 wet sanding |
 |
| Nitro spray 6 coats 2 hours dry time between coats |
A good reference for spray schedule and tips. http://www.reranch.com/101a.htm
 |
| Wet sanded with 320, 600 and 800 using a block. Looks smooth but hazed. Add 2 light coats then wait 2 weeks to sand and buff |
 |
| Final- wet sanded 600,800 1000, 1200 then buff with medium paste on drill mounted sponge wheel to match existing finish |


This comment has been removed by a blog administrator.
ReplyDeleteThis comment has been removed by a blog administrator.
ReplyDeleteThis comment has been removed by a blog administrator.
ReplyDelete